The videos and instructions on this page show how to use the Review tab features of Microsoft Word with Dragon dictation software (formerly Dragon NaturallySpeaking). In the videos, I am using Dragon Professional Individual 15.61 and Word 2019.
If you are using one of the versions of Word that offers the Modern Comments feature, be sure to choose the option of reverting to Classic Comments for adequate compatibility with Dragon (Click File, Options, and General, and then uncheck “Enable modern comments”).
- Using Dragon to Add and Edit Comments in Word (video)
- Using Dragon to Reply to Comments in Word (video)
- Using Dragon to Toggle Between Simple Markup and All Markup (text)
- Creating a Macro to Toggle Between Markup Modes in Dragon
- Using Dragon Check the Word Count in Word (text)
- Using Dragon to Open and Close the Thesaurus in Word (text)
- Dragon for Advanced Users: Adding Comments from Anywhere in Word (video and text)
Using Dragon to Add and Edit Comments in Word
This 8.19-minute video is for those who are new to using Dragon dictation software with Comments in Word. It covers inserting and deleting comments, moving between the document body and comments, and replying to and resolving comments.
Using Dragon to Reply to Comments in Word
This 3.07-minute video is for Dragon dictation users who know the basics of inserting comments by voice but aren’t sure how to access the Reply feature. I demonstrate moving from the main document into an existing comment and replying to it.
Update: Saying the word “reply” after you have entered an existing comment occasionally fails to open a reply. My best guess is that this feature fails if the author of the original comment created it using the Modern Comments interface. The only solution for this—and it is not ideal—is to use the Mouse Grid to click on the Reply button.
Using Dragon to Toggle Between Simple Markup and All Markup
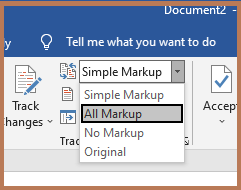
When you are using tracking in Word, sometimes you want to see all your changes (the All Markup view) and other times only the comments (the Simple Markup view). To switch between the modes by voice, go to the Review tab (if it’s not already open) by saying Review. Then say Display for Review.
As shown in the accompanying picture, a drop-down box will open on the Review bar that offers a choice among Simple Markup, All Markup, No Markup, and Original. All you have to do is say the name of the markup style you want (e.g., Simple Markup). That style will be selected, and the cursor will return to its original place in the document.
Creating a Macro to Toggle Between Markup Modes in Dragon
Another way of toggling between markup modes is to create a macro by following these steps:
1. Go to the View menu and say Macros; then Record Macro.
2. Give the macro a name, such as SimpleMarkup. Make sure to run the words together (macro names can’t have any spaces between the words). Then say Keyboard and assign an unassigned key or keys to your macro. Dictate the keys into the Press New Shortcut Key box. I use Control + F7 for Simple Markup. Then say Assign.
3. After you say Close to close the Customize Keyboard box, the record function will be active. Say Review, then Display for Review, then Simple Markup. Immediately after you have done that, say View, Macros, Stop Recording.
4. Now test your macro. Say Review, Display for Review, All Markup. Once you are in the All Markup mode, say Press Control F7. You should see the markup mode switch to Simple Markup.
5. Follow the same instructions to record a macro for switching to All Markup, assigning a different keyboard command. I use Alt + Control + F7 for All Markup. If you wish, you can also record macros for the other two markup modes (Original and No Markup). I tend to use those modes infrequently, so I use the Display for Review command rather than a macro if I need to access them.
Using Dragon to Check the Word Count in Word
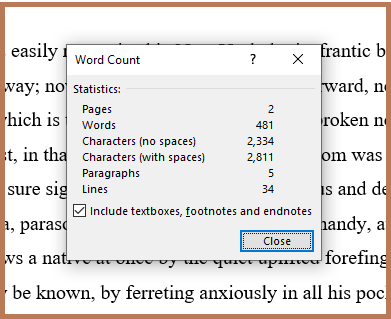
Are you looking for the word count feature in Word? Go to the Review tab by saying Review. Then say Word Count. To toggle between showing the word count with and without footnotes, endnotes, and textboxes, say Press F. (The fact that the F is underlined in the phrase to the left of the checkbox tells you that it can be used as a shortcut.) Or toggle between the modes by reading the phrase written next to the checkbox in full: “Include textboxes, footnotes and endnotes.”
Using Dragon to Open and Close the Thesaurus in Word
The thesaurus in Word has poor integration with Dragon dictation software. It is easy to open the thesaurus sidebar but then almost impossible to interact with or close it. Therefore, I have developed the following method for working with—or more precisely, working around—the thesaurus. The procedure, which is described below, requires no special macros or scripts; rather, it employs the inbuilt Dragon commands.
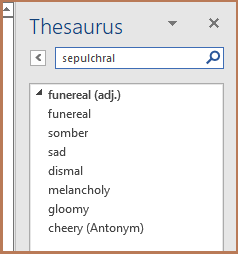
Select the word you want to look up. Then say Open Thesaurus, Show Thesaurus, or View Thesaurus. The newly opened thesaurus will look like this. The cursor will be in front of the word in the search box (“sepulchral” in this case).
Look over the list of synonyms offered in the sidebar, decide on the one you want to use, and commit it to memory.
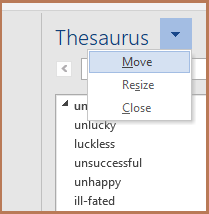
Then say Press Control Spacebar and, after the drop-down menu shown here appears, say Close. Now dictate the synonym you have chosen into your document.
WARNING: If you dictate anything between opening the thesaurus and closing the thesaurus sidebar, the focus will shift, and you will no longer be able to close the sidebar in this way. Also (and weirdly), this procedure for closing the sidebar does not work if you opened it using the single-word command Thesaurus or by dictating the keyboard command Press Shift F7. You must say Open, Show, or View Thesaurus instead.
This is an imperfect work-around. If the list of synonyms is long, there is no way to scroll down to see those that are hidden without losing the ability to close the thesaurus easily. But if you are trying to use Dragon without touching the mouse, this method can help.
Dragon for Advanced Users: Adding Comments from Anywhere in Word
The default behavior in Microsoft Word is that comments can only be added to a document from the Review tab. This 3.55-minute presentation describes how to tweak the commenting feature in Word so that commands can be added from anywhere in Word. I’ve summarized the process below as an aide-mémoire.
Step-by-Step Instructions for Adding Comments from Anywhere in Word
If a Dragon user says “New Comment” when any tab except the Review tab in Word is open, the words “New Comment” rather than an actual comment appear in the document. But by customizing the Ribbon in your copy of Word, you can dictate, delete, and access comments from any tab. To do this, you need to add the group of Comment features to the tabs of your choice, as shown in the accompanying video. These step-by-step directions will help you duplicate the process.
1. Say Click File Tab and then Options. When the Word Options box opens, say Customize Ribbon. Then say Tab. That will take the cursor to a drop-down box arrow beneath the words “Choose commands from.”
2. Say Press down Arrow and then Main Tab, followed by Enter. Next, say Review, which will give you the option to add various items from the Review menu to other tabs. Use the Mouse Grid to click on the word “Comments” to highlight it.
3. Once Comments is highlighted, switch to the destination pane by saying Customize the Ribbon, followed by Press Down Arrow, Main Tabs, and Enter. Then use the Mouse Grid to click on the name of the tab to which you want to add the feature (e.g., Home or View). Now, you can simply say Add, followed by OK, to add the Comments group to the new tab.
4. If you want to customize the Ribbon further, instead of saying OK after adding a group or feature to a new tab, say “Choose commands from” to go back to the left-hand pane and choose another feature or command group.